Here is another blast from the past. When we bought this house, we had the largest dining room we have ever had. The previous owners had a large table as well as a large desk and office space in there. We put our table in there and then we realized that there was A LOT of extra room. We had no need for office space so what did we want to do to fill the space. We toyed with the idea of bar area. We are not big drinkers (I really don't drink at all) but it seemed like someplace cool to put tall chairs and hang out with some sodas. Then we moved on to ideas of more seating. More specifically a breakfast bench and table. We looked around and priced them, but they all looked hard and uncomfortable.
My husband has a brother and SIL who combined have 4 kids. When they came to dinner (or really any group larger than us 3) we would run out of chairs. We figured having the second table would be great when they came to visit as well as great as a homework table or coloring table away from the main dining room table. We decided once again the best course of action was for me to build my own.
It came out to about 5 feet by 4 feet L shaped design. I researched how to build a bench using 2 x 4s and 3/4 inch MDF for the frame. The hard part was wanting to have it upholstered with a nice padded back and bottom. I found some nice green fabric and some 1 inch foam pieces. I am always shocked by the price of foam. Seriously! Is this a rare item or difficult to make that the price per sq ft is exorbinant? Either way, it was easily one of the more expensive parts of this project. 2x4s are super cheap and 2 sheets of MDF are also nor very expensive comparatively.
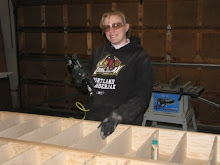
I created the basic shape with the 2x4s.
I added some posts to support the back.
I cut the pieces of MDF to fit. I laid them in place first to be sure I had the basic shape and fit I was looking for.
I did the next step in a very complicated way. I have no idea if it was the best way or the long difficult way. Either way, I upholstered each of the back peices seperately and then attached them. Same with the bottom. It wasn't easy, but I just keep finding ways to actually secure each piece and still upholster it at the same time. I used 1 inch thick foam for the back and 3 layers of the 1 inch foam on the bottom.
Here is the back and bottom all done.
I screwed the base pieces into place. It really started to take shape and feel complete here.
Some paint, some trim, and we had ourselves a cool new bench seat. All that it needs is a table right.......(see next blog for my favorite table)


Friday, September 18, 2009
The Dining Room Benchseat
Posted by Sawdustmomma at 7:21 PM
Subscribe to:
Post Comments (Atom)

Wow, Tabitha, that is so cool!!! I wish I had skills in woodworking- I can think of a million things I would like to do, including built-in benches for our kitchen! Nice work mama!
ReplyDelete~ Tasha
There are some simpler plans for bench seats. In the next year I want to build a new dining room table (for our main table. This is our second table) and when I do I am going to build a bench seat for one side. We don't have many chairs and they are WAY overpriced to buy more. Bench seats are great for how active kids are. If I find some simple plans, I'll pass them along.
ReplyDeleteOr I can build one for you and we can meet half way between Seattle and Portland and I can give it to you. Granted if you want a full bench seat like this one, it will be harder, but not impossible. That thing is HEAVY!